Working with Projects
![]() Creating a project to proceed with an idea
Creating a project to proceed with an idea
Ideas in status evaluation can be moved forward to your custom back-end process.
- Open an idea in status Evaluation.
- Hover the actions button in the lower right corner and select and select Create Project.
- Enter the project title and description.
- Assign project leaders and project team members.
- Add details - attachments.
- Optionally, upload a project image (*.png, *.jpg, *.gif).
- Optionally, enter the phase timing. Read more
-
Click Start Project.
To save the project as draft, click the Close icon in the upper right corner.
The project is now in the first phase. The project leader and the team are in charge. The project title is set to the idea title. The project summary displays a link to the source idea. The source idea displays a link to the project.
When the project is started,
- the idea moves into the status Selected for Project.
- the start date of the first project phase is set to the current date.
- a link to the project is added on top of the idea page.
- the idea appears on the campaign's Results page.
Creating a project for multiple ideas
You can create a project for multiple ideas via a multi-action in the idea board.
- Open the campaign/channel where the ideas have been submitted.
- Hover the floating button in the top right corner and select Manage Campaign.
- Go to the idea board.
- Select the ideas you want to create a project for.
- From the ... menu on the right, select Create Project (in HYPE Projects).
Note: Starting a project via the multi-action will not automatically forward the selected idea into another status.
![]() Opening a project / project overview /search
Opening a project / project overview /search
Depending on your basic rights, you can access the project overview on several ways.
- Open Explore > Projects.
- Open Library > Administration > Projects.
All users can see all projects. Users holding a specific role can find their projects by categories (I am in charge, I am leader, I am in the team), by Processes and Phases, by tasks, and via a full text search in project titles and project descriptions.
The full text search is case insensitive and finds all occurrences of the term you enter: *"<search term>"*.
![]() Completing project tasks
Completing project tasks
- Open the project overview.
- Under I am Project Leader or I am Team Member, your projects are listed.
- Click the project to work on (must be in status Elaboration).
- On Summary, read the description.
- Click Activities and Tasks.
- Click the activity to work on.
- When all tasks are completed, the team leader can move the phase to the gate (decision).
![]() Moving a project forward to gate
Moving a project forward to gate
- Open the project overview.
- Filter for the projects where you are project leader.
- Click the project to move forward (a project that is in elaboration).
- On Summary, click Forward to Gate.
- Read about the gatekeeper's required skills.
- Assign one or more gatekeepers.
- Forward Project to Gatekeeper (phase is ready for decision).
![]() Making the decision - moving the project to the next phase
Making the decision - moving the project to the next phase
- Log in a s gatekeeper and open the project overview.
- Go to I am in Charge and open the project.
- Have a look at the activities and task. On Activities browse through the tasks.
- On Summary, click Make Decision.
- Under Message to Team, you can enter some notes.
- Forward to next phase, or back to rework, or postpone, or stop the project.
![]() Editing a project
Editing a project
You can modify the project settings (project state (phase and status, )).
- Log in as project leader.
- Open the project.
-
On the Project Summary, click Edit Project
 and on the Basics tab edit one or all of the following:
 Title, image, description, leader, team members, attachments.
On the Additional Settings tab you can set the project to confidential / public.
- To leave the edit mode, go back to the Summary.
![]() Editing the project time line (phase timing)
Editing the project time line (phase timing)
You can specify and adjust the start date of your project, and the end date of each phase.
- Log in as project leader.
- Open the project.
- On the Project Summary, click Edit Project and on the Phase Timing tab enter the start and end dates.
Note: If you leave the dates empty, the dates will be filled in automatically when you move the respective phase to gate.
![]() Getting an overview about the project phases
Getting an overview about the project phases
- Open the project.
-
On the Summary page, in the header, click process name.

- The current phase is highlighted. The goal of the phase is displayed.
![]() Changing the project phase or status
Changing the project phase or status
Portfolio managers and tenant admins can change the project phase and status at any time.
- Open the project.
- On the Project Summary, click Edit Status
 .
.
The phases appear as defined for the process your current project is based on.
Tracking projects progress
Use the portfolio analyzer to get an overview about the status of your projects.
- Log in with portfolio manager or innovation manager rights.
- Open
 > Ideation Reports > Other > Portfolio Analyzer.
 - If you are working with multiple processes, you can select the process the projects are based on. The analyzer only considers projects that are based on the same process.
![]() Getting an overview about projects you are involved in
Getting an overview about projects you are involved in
You can find your projects on Explore > Projects.
![]() Finding projects that are linked to an idea
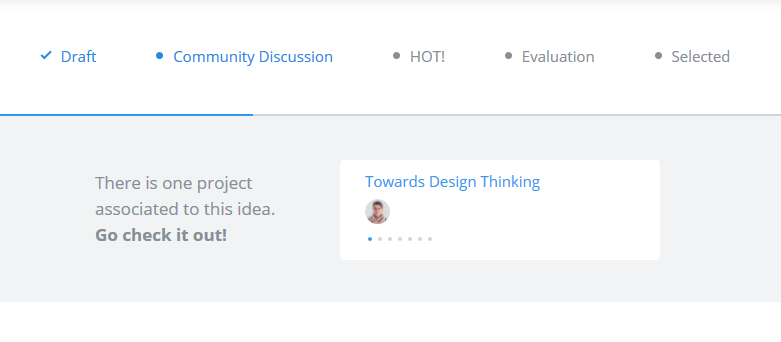
Finding projects that are linked to an idea
Projects can be linked to ideas. On the idea page, linked projects display on top of the page. Hover over a project tile to see the project description and the project phases.
Projects that are linked to an idea of a campaign/channel are displayed on the Results tab > Projects.
 Deleting a project
- Log in as tenant admin.
- Go to the projects overview.
- Click the delete icon.
Note: Draft projects can also be deleted by portfolio managers.
![]() Creating a stand-alone project (1)
Creating a stand-alone project (1)
- Log in as portfolio manager.
- Go to the projects overview.
- Click New Project
- Enter the project title and description.
- Assign project leaders and project team members.
- Add details - attachments.
- Click Start Project.
The "stand-alone" project cannot be linked to ideas.
![]() Creating a stand-alone project (2)
Creating a stand-alone project (2)
- Log in as portfolio manager and member of the user group IO Project Creator.
- On the main menu, open + New > Project.
- Enter the project title and description.
- Assign project leaders and project team members.
- Add details - attachments.
- Click Start Project.
The "stand-alone" project cannot be linked to ideas.
![]() Exporting Project Data to Excel
Exporting Project Data to Excel
- Log in as portfolio manager, process designer, or tenant admin.
- Go to the projects overview.
- Scroll down to the bottom of the list, and click Export All Projects
- Save or open the file.